Building a Brewery - Part Four - Time for a new power tool baby!
- oliverhargreaves
- Feb 2, 2024
- 3 min read

Checklist? - Check
Money all in line? – Check
Permission to launch? - Check
Time to crack on with the fun stuff? – We think so!
The heavy lifting of our little project was undoubtably the most rewarding – with each step feeling like one giant leap forward in our quest to run our tiny little brewery.
The first thing we needed to do was clear space for all of the kit, so some time spent on researching compliant loft boarding kits that were going to keep our loft well insulated and importantly our new build insurance policy intact! Thankfully we found a great system that we could quickly and easily install ourselves.
Over the course of one of the early weekends of January we set to getting the loft boarded out before spending the next sorting the stuff that was going up there vs the stuff that was going to be making it’s way off to the tip. The weekend after that was putting everything up there and with that, three weekends later, we had our space ready to work on.

What I didn’t mention there though was in between, as mentioned in an earlier article, we found the brewing kit we wanted sooner than we'd planned and had to buy it quickly. So no sooner had we cleared our space ready to start work it was clogged back up again with brewing gear… hmmm.
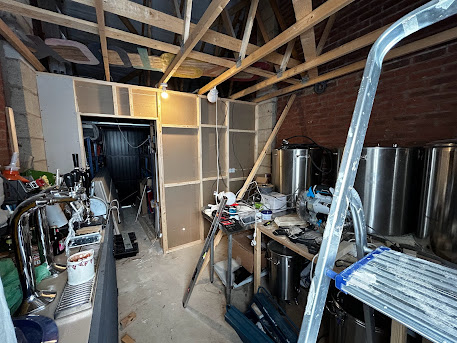
Nevertheless a big Wickes timber order and a couple of weekends later we started cutting, sanding, drilling and boarding until we had our partition wall up. The first big step in creating our brewing space. Over the course of the next few weekends, in the cold winter weather we spent time in the garage banging, crashing and cursing as we finished off the wall, installed the ceiling, hung a door, painted the floor and moved electric sockets and lighting around to fit the new layout.

Now let us tell you this. Sure we’ve done painting, we’ve hung a few pictures. Hell we’ve even put up curtain rails and blinds before but we have never done any kind of DIY like THAT. Let us also tell you this – it ain’t half rough around the edges! But we look at it in marvel and with pride, something created with very own fair hands. A jolly good feeling if we do say so ourselves.
Before we could start to put kit in place we still needed to cover off getting a new electricity supply into the garage. The kit we had bought would have blown the house electrical supply the moment we switched it on so a big beefy cable was required and so we got our friendly local neighbourhood electrician along to do a proper job, certifying the whole lot in the process. He did a brilliant job.
We also needed to get a water supply and sort drainage. Initially we thought that would be something we could get a plumber to get involved with but the quotes we were getting in for the job were way and above what we had sat in the budget so it was a case of do it ourselves to an acceptable standard and maybe get the pro’s in when we could afford it. So we created a water supply off the garden tap, dug trenches, drilled holes, cut and connected pipes and in a couple of days had created a fresh water supply to the garage. The drainage, for the time being, would have to be a temporary solution until we could create afford a more permanent installation.
And with that we were done. We had a brewery in our garage. Of sorts anyway. So we're ready for launch then?! Well, I guess so. Lets see in our final offering of the series.

.png)


